Starting the Year #2: Extending CI While Staying In Bounds

For Part 1 of this post on student surveys and PQA, click here.

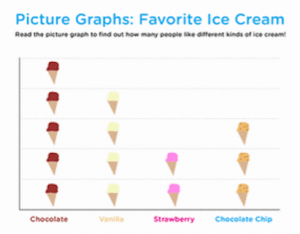
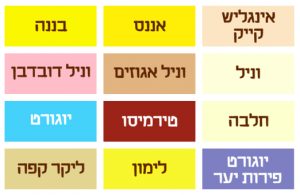
How can we get lots of repetition on hi-frequency language, so that the students develop a practical Hebrew foundation?  Here are some ideas for after you take an oral survey of student interest, such as ‘Which ice cream do you love?’  (See an extensive Hebrew menu of  ice cream flavors here.)

Layer on a Visual Anchor:

When we casually ask the same question to each class member and orally collect personalized survey information, massaging it into a compelling conversation, we can later insert this new-found information into a graphic organizer.  This allows us to focus on a visual anchor as we review the community’s preferences, and since we’re doing it with a new visual, it feels fresh and novel.

Simple visual aids may include:  

  • A labeled T-chart
  • a bar graph
  • a tally chart
  • a simple list

We can easily draw this on the white board at the front of the room.  We can get fancy, adding colorful artwork, borders, graphics, etc.

Then, we review and discuss (same or next class) based on that class-specific visual.  No extra work for teacher – we build the graphic in real time or after the initial conversation.  We may need to think through what we’ll want the info graphic to look like, and prepare, print or draw a template.

We may also choose to create a paper template, so that each student can track the data as it’s collected – but wait to do this until after the students demonstrate a secure foundation in basic Hebrew – several hours/months into the school year.

By the end of this session of circling, interviewing and asking details using repetitive language, comparing and contrasting preferences, restating and re-telling in slightly different phrasing (“They love; they do not love”), and presenting the data visually in a graphic organizer, you’ll be ready to add some new questions to the mix.

How many students love Tutti-Frutti?  

How many girls love ice cream that has chocolate?

NB:  Make sure the ?כמה interrogative poster from my Hebrew Corpus Word Wall is posted for Pause-Point-Slow.

Another easy visual way to anchor a survey discussion is via a slideshow – in this case various internet images of different ice cream flavors.  (Requires projector and screen).  Simply narrate your way through the slides, asking questions and making comments as you flip through.

Experiment with different formats, beginning with those that seem easiest for you to execute, allowing you and the class to remain comprehensible and interesting.

Literacy Extensions:

*To practice writing their names while creating a simple bar graph, have each student write/copy his/her Hebrew name  (from a prepared slide or chart) on a sticky note and ‘vote’ in the appropriate survey column. (In this case the column titles will be preferred flavors of ice cream.)

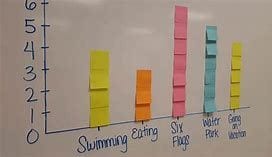
*Create a brief reading on the board in real time by writing sentences from the discussion and model reading them aloud.  Ask students to join in if they want, otherwise visually track the words as you read.

*Write up a ‘class story’ – a series of patterned statements based on the conversation –  and a sentence about each student -and read it to the class.  

Kids of many ages (not just the youngest!) love to illustrate their class story page – experiment with giving a few minutes/crayons to do this – the resulting ‘book’ is a lot more inviting to read.

Writing/Dictation:

*Point to written class list of students’ names – this is good to have on chart paper for all to see and decode throughout the year. 

Do target language dictations on dry erase boards, (lowers anxiety), one sentence at a time.  We want sound and meaning already in their heads when they come to a writing/reading task.  Let’s say we want to dictate these 3 sentences:


1.  Alisa loves Moose Tracks ice cream.      .עליזה אוהבת גלידת מוס טרקס

2.  Talia has an allergy to chocolate.            .לטליה יש אלרגיה לשוקולד

3.  Gavriel loves Mint Chip.              .גבריאל אוהב גלידת שוקולד מנטה  

The purpose of dictation, for our setting:

  • Associating sound and meaning to the letters/ written word
  • Hebrew cursive letter formation (muscle memory)
  • Building student confidence

Follow the dictation protocol below, keeping dictated sentences short and simple to guarantee student success.  

Before starting, briefly discuss behavioral expectations regarding dry erase board/materials use.

For example:

We respect these materials, insuring that they can be used again and again by:

  • not tapping, scratching, doodling, throwing, etc.
  • demonstrating we understand my instructions

Back to the task: 

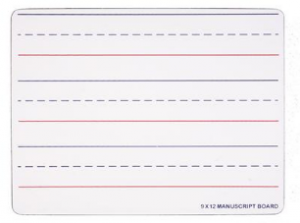
Students write the one sentence they hear on lined side of dry erase board.  

Hebrew alphabet poster -block and manuscript letters -at front of room.

Teacher repeats the sentence aloud as requested.

Teacher circulates and notices non-standard inventive spelling/letter formation.  It’s OK!  Spelling emerges over time from reading.  It probably won’t be accurate to start.  Resist your impulse to correct student work!

After students have attempted to write it, teacher models/writes correct sentence in large cursive print on the board.  Students are noticing how you form your letters, so write big, slowly and clearly here.  We give them a minute to compare their version with yours, noticing differences, then students copy the correct version below their initial attempt.  Afterwards they may erase, or if they want and there’s room, go on to another dictated comprehensible sentence.  

Briefly point out ‘final letters’ in Hebrew, or other surface features.  

Students look at the 2 versions, then erase or continue same protocol for next sentence.

See my related blog post:  https://cmovan.edublogs.org/2016/09/22/demystifying-hebrew-literacy-part-1/

Practice Hebrew classroom survival phrases by having students follow your commands:

  • pick up/put down boards/markers
  • uncap/close markers
  • write/ erase

By laying in these instructions, you insure that you can conduct subsequent dictation activities entirely in Hebrew.  All repeated class routines, such as materials distribution and collection, are worthy of laying in in the target language, since they will come up over and over again.  Materials management is a great way to provide concrete language and allow students to demonstrate their understanding with a performance task.

Read about Classroom Hebrew survival phrases here:

https://cmovan.edublogs.org/2017/03/21/survival-for-the-comprehensible-hebrew-classroom/

and find my Classroom Survival Expressions when you scroll down on the Hebrew Corpus.

Teach, write, establish meaning and point to the Hebrew words, “Please repeat/Again” so that students can self-advocate whenever necessary.

I recommend not sacrificing more than 5-7 minutes at the end of CI class time for dictation.  It serves as a brain break & alternative literacy activity, and to help develop recognition of the letters and their formation, but focus on your primary goal of driving acquisition by providing a flood of compelling, comprehensible input. 

Everything I learned about Dictation, before trying it and tweaking it in my own elementary classroom, I learned from master CI French instructor, Ben Slavic.  See his Dicteé protocol, here.

Summary Of T/CI-Aligned Practices:

All this personalized surveying at the beginning of the school year and throughout, serves several crucial purposes in the Comprehensible Input framework:

  1. Provides lots of connected, compelling, tailored Comprehensible Input at the discourse level
  2. Provides massed exposure through repetition of hi-frequency practical language
  3. Slowly builds students’ stamina for processing conversational /discourse-level Ivrit
  4. Builds a community that is warm & playful, where each individual feels known and therefore safe
  5. Establishes class norms and behaviors, by pointing them out/modeling norms if/when there are infractions
  6. Sends a strong message that in this class, we communicate primarily in Hebrew – that you understand – to build our Hebrew skills

Caveat On Survey Questions:

We want interesting info without being too personal or potentially sensitive (asking abt parents if there is divorce; asking about a pet when someone’s dog just died, etc.)

SOME SAFE TOPICS FOR INTEREST SURVEYS:

(Advise older students that only vetted and appropriate topics will be included in this class)

-Favorite ice cream flavor ‘Which ice cream do you love?’, fruit, etc.

-Favorite childhood picture book

-Do you have a pet/ pet name – non pet owners can pick a dream pet (including fantasy pets – here we offer cognates like dragon, flamingo, gorilla, etc.)

-TV – possibilities are endless but must be appropriate – train your Ss to suggest only ideas appropriate for a the setting – no violence, romance, swearing, etc.

-Least/favorite – restaurant; chores; vegetables 

-(Least)/favorite book/movie; or character (or any art form)

-(Least)/favorite place to hang out (specific) other than school

-(Least)/favorite music type/song/artist

-Dream vacation – where (specific)?

-Is your room neat or messy?  ?החדר שלך מסודר או יש בלאגן

-Secret talent

-Secret fear (all secrets can be invented – this is Hebrew class – where anything is possible!)

Again, we the teacher are very interested in our students’ answers, we are teaching to the eyes, spinning the conversation out of the (sometimes fantasy) ‘facts’ we are collecting – comparing and contrasting – extending the language and getting lots of repetition; recording the info visually and/or in writing – via info graphic and/or a class story.

Here is another survey questionairre you may be able to use – click on “See Inside” above the graphic.

https://teachables.scholastic.com/teachables/books/Student-Interest-Survey-9780439303026_028.html

Whew.  A lot to think about at first.  How much language?  When to establish meaning by writing on the board?  How often to circle, and which parts?  (Go for the verb-containing chunk!)  You will try it, and it will get easier.  Like the language itself, you’ll begin to acquire some practices with automaticity, freeing up your brain space for other concerns.  Your skills will grow!!  The main thing is to get started, give it a try, and watch your students bask and thrive in a warm pool of compelling, comprehensible input!

*Terry Waltz, PhD.  See Hebrew ‘Super 7’ verbs here – scroll down to page 15.

Starting The Year #1: Build A Solid Foundation With PQA

Where to begin?

Starting the year in a proficiency-oriented Hebrew classroom, where we aim to soak our students in compelling and comprehensible messages, can seem like a daunting task, particularly for teachers new to the strategies, and students who haven’t really heard a lot of connected Hebrew-for-communication before.  With any luck, this series of posts will serve as ‘Golden Rails’ to follow, on this first exciting leg of your Teaching with Comprehensible Input (T/CI) journey.

Personalization & Circling Through Surveying

First, select a compelling topic of interest

Criteria:  

  1. Is it developmentally appropriate & compelling for the age group, and topically appropriate for the setting?  
  2. Is it simple, concrete, and can you support it with visuals – gestures, dramatization, sketches, images, props, etc.?

Say I decided to comprehensibly circle the survey question,  “Which ice cream do you love?”  ?איזה גלידה את אוהבת

I might:  

  • Point to the interrogative poster, ?איזה pausing after I say the word
  • Pretend to hold and lick my (imaginary) ice cream cone
  • Draw a sketch of an ice cream cone and an arrow pointing to the scoop – soon after I say the word and gesture its meaning
  • Write the word  גלידה  with the English translation words, ‘ice cream’ clearly below it, in a contrasting color
  • Slowly pause and point, indicating the ‘Super 7’* hi-frequency verb, אוהב/אוהבת  
  • Gesture the ‘love/s’ verb by forming a heart shape with my hands near my heart
  • Check for comprehension, by repeating the Hebrew question, then asking a student, “What am I asking?”

Let’s assume that during the course of my conversation, surveying student after student, I get lots of repetition of similar sentences that contain ‘love’ and it’s negation, ‘doesn’t/don’t love.’

Say I learned from this initial survey question that:

•Tova loves Mint Chocolate Chip

•Gavriel loves Rocky Road

•Alisa loves Moose Tracks, etc.

I can include my own opinion on ice cream, thereby inserting the אני pronoun and voice, as in,

אני לא אוהבת גלידת שוקולד מנטה’

As I ask each of my students’ preferred flavor, I compare and contrast loves and dislikes as I move about the room.

‘Tova, you love Mint Chocolate, but you don’t love Rocky Road?  Class, who loves Rocky Road?   I really love Moose Tracks…and you, Gavriel, do you love Mint…?’  

If I wanted, I could offer cognate flavor choices in advance, writing them on the board and pausing/pointing each time.  

Otherwise, I write down the flavors in Hebrew or English (names of ice cream are not the goal of the lesson, but do offer opportunities for success in decoding.)  

RESOURCE:  Familiarize yourself with many borrowed name flavors written in Hebrew with this Hebrew ice cream menu

These are only a few of the many flavors on the menu!

If your class already has solid letter/sound recognition of the Hebrew alphabet, then you may choose, if possible, to project this ice cream menu and decode it together as a class at the end of the oral surveying phase, (skip over the non-cognate flavors – they won’t have meaning) or print it out.  Alternatively, copy only the direct cognate flavors onto chart paper, making your own more limited but comprehensible menu.

Back to my students and their flavors:

I notice that all three of the above students love ice cream with chocolate in it.  “Ahhh, Tova likes Mint Chip, Gavriel likes Rocky Road and Alisa likes Moose Tracks…they all have chocolate!” – I write the word for ‘has’ in both languages to establish meaning.  I gesture ‘has’  by cupping my open hands side by side as if I’m scooping up water.  I insure comprehension by telling the students that this is my gesture for יש /have/has.

I encourage the students to use the gestures, too, every time they hear the word.

Then I ask the class and/or individual student for confirmation:  

“Class, does Mint Chip ice cream have chocolate?”

“Avi, does Rocky Road ice cream have chocolate?” 

“Ya’akov, does Moose Tracks ice cream have chocolate?”

“Class, does Banana ice cream have chocolate?”  

I can ask about as many flavors that were mentioned in class as I want – following the demonstrated group interest and energy in the room.

Now, I have used two important hi-frequency verbs in context, ‘love/s’ and ‘have/has’ with their negations, ‘doesn’t love,’ and ‘doesn’t have.’  I am gesturing, pausing/pointing and spot-checking for comprehension as I extend a conversation based on the information I’ve collected.  I’m noticing trends in ice cream preference, comparing & contrasting, grouping, counting, and confirming, all within this narrow set of language in use.  

I am staying ‘in bounds.’

I make sure to ask a full question each time;  that way the verb-containing chunks (love/s; has/have) are always repeated.  I gesture the heart shape for ‘loves’ and my hand cupping  ‘have/has’ gesture, whenever the words arise. 

‘Tova loves Mint Chip, yes, Tova?  You love…? Class, she loves Mint Chip but she doesn’t love…Banana?  Tova, do you love Banana?

Class she does love Mint Chip….’

I check for comprehension regularly.  What does ‘יש’ mean?“  “What does this (heart gesture) mean?” 

“What does, גבריאל לא אוהב גלידת בננה  mean?”  

Then I move on to a different student, Ester, and ask her what kind of ice cream Tova likes; ask someone else to confirm Alisa’s favorite ice cream, etc. In this way I am constantly recycling the language, checking to make sure the information was understood, and extending the conversation to include more participants.  All the while we are communicating and learning about each other as we build our light-hearted community.

I continue comparing and contrasting students and their favorite ice cream until I’ve surveyed everyone in class.  I may introduce the connecting words, ‘but,’ and ‘also/too’ as in, ‘I like Moose Tracks ice cream, but Ya’akov loves lemon ice cream.’  Or, ‘Ya’akov loves lemon ice cream and Smadar loves it, too.’

Rule of thumb:  If it feels automatic and effortless for the students to understand, then you are in the Sweet Spot.  Resist the temptation to pile on more new language.  Wait ’til next time.  And these new words will have to undergo the full treatment:

-Using them in context

-Writing them on the board with translation, to establish meaning

Pause-point-slow
-Use a gesture / image / prop

-Comprehension check

Some students like fruity flavors.  I ask Talia if she (also) likes Moose Tracks.  I establish meaning of the word ‘also,’ pausing and pointing to it on the board with each subsequent use, and doing comprehension checks intermittently.  She exclaims (in English – no worries) that she’s ‘allergic to chocolate.’  !היא אלרגית לשוקולד

Hurray! a direct cognate.  I walk over and tell Tova, Gavriel and Alisa the news – each separately, that Talia doesn’t like their specific ice cream – because she’s allergic (If you choose to use it, establish meaning of ‘because’ on the board in both languages).

How long the oral survey/classroom banter carries on depends on your growing skill in maintaining interest and understanding.  We try to reach all the kids in the class in one session, so pace yourself accordingly!

In the next Starting the Year post, learn how to be repetitive without seeming repetitious as you circle your way through PQA….Or is it repetitious without seeming repetitive?  

Survival! For the Comprehensible Hebrew Classroom

As we careen toward פסח and then to the end of another Hebrew school year, I’ve transitioned from my role as teacher trainer and lesson modeler, to coach and mentor.  I enjoy observing and providing positive feedback to my colleagues as they experiment with their newly adopted teaching with comprehensible input (T/CI) strategies, and I continue to learn so much about how to support both our students’ Hebrew acquisition, and our teachers’ acquisition of the T/CI skills!

My coach/mentor comments after I observe a lesson focus on:

  1.  What the teacher did to help her students feel welcome and comfortable (to keep the affective filter low, and optimize the environment for acquisition);
  2.  How she made the Hebrew comprehensible, contextualized and compelling for her students.

One pattern I have found across observations is the need for a compilation of Survival Hebrew for the CI Classroom.  We need to have Hebrew go-to phrases for general classroom management; materials distribution and collection; director’s cues for student actor dramatization, and more.  Of course every time we try something new requiring instructions, we can make the Hebrew utterance comprehensible by establishing meaning (writing the Hebrew and it’s English counterpart clearly on the board, followed by gesturing and other extra-linguistic supports).  Of key importance is maintaining the flow of input in Hebrew without constant English intrusion or code-switching (i.e., alternating between languages in the context of a single conversation).

Incorporate the specific required ‘teacher talk’ only as the need arises.  If, for example, you don’t use the dry erase boards, markers and erasers for the first say, 3 weeks of school, concentrating instead on flooding students with aural input, then when you do decide to bust out the materials, think through both the distribution/collection protocol (so that it’s efficient and repeatable) and the Hebrew you will use to operationalize the task.  There are the names of the materials to consider, and also such imperatives as:  Take, pass, put, give, open/close (the door/marker); draw, show, write, and erase, just to name a few!  Practicing a subset of these commands in advance, a la Total Physical Response (TPR), is both a fun way to manipulate the materials as well as an effective form of comprehensible input.  This year, I had my Hebrew students practice manipulating the materials according to my instructions for a few short minutes, every time we used them.  (For a discussion on TPR, see this blogpost.)  Many successful CI teachers have very particular protocols for materials management, allowing them to minimize interruptions & English usage, while maximizing target language input and enjoying a concrete demonstration of student comprehension.

Here’s an example of using target language to manage materials distribution.  Notice how I choose a simple way to express my wish, and then repeat the heck out of it, using individual students’ names, while they manipulate the materials.  It feels kind of like kindergarten, only for our students, it’s more novel and challenging in a new language!  I designate some passers (often people sitting at the end of the row) to distribute a row’s worth of boards, pens, or erasers to their neighbor, who then passes across the row.  Materials are also collected row-at-a-time in this fashion.  So to practice, I might say,

“Chaim, you give 5 boards/pens/erasers to Shira.

Shira, you take one board/pen/eraser and please give the boards/pens/erasers to Yoni.

Yoni, please take one board/pen/eraser and give the boards/pens/erasers to Ronit,” etc.

Hopefully, you can see how such narration and repetition during this ‘training’ phase also provides tons of contextualized comprehensible input!  To spice it up, some teachers practice this (narrated or not!) distribution routine with a timer, and repeatedly try to beat their class’ best time.

I’ve added my Classroom Management and Survival Hebrew to the bottom of my Hebrew Corpus.  It’s a go-to list for some of the survival Hebrew that might arise in your T/CI classroom.  I invite you to respond to this post with suggestions for additional entries, as the list will be periodically updated.  Please note that not all the classroom directions need be expressed in the ציווי or imperative tense.  We can also express commands using the Hebrew infinitive, and in the indicative, as in, “Now you (the students) are drawing a giraffe.”  We can sometimes change the ‘person’ when speaking to an individual (male or female) or the group, so long as we establish meaning, without grammar explanations, unless specifically asked (grammar explanation requests are rare among young learners).  There are no rules about this, except that we don’t interrupt the flow of Hebrew by naming or explaining (in English) which tense/person we are using and why, or how the tenses/persons are formed, or how they compare to one another.  We’re just going to say it; establish meaning (translate the Hebrew utterance by writing underneath in English); and when possible, add a gesture and/or use a prop to help support understanding.  And don’t forget, for our novice learners we can choose to substitute an oral instruction for an extra-linguistic prompt, as in gestures & facial expressions, which can be combined with props, pictures and sketches.

It’s my hope that having a handy list of common classroom management expressions to be introduced and used as needed will help keep our Hebrew comprehensible input train chugging happily along the rails!

Finally, a class video!

Quote

I won’t bore you with my technological woes.  Suffice to say that it ain’t easy pulling a 10-minute iMovie off your iPad (unless it’s one with ginormous memory), let alone converting it into an unlisted Youtube movie.  (I lost my first completed version of the movie and had to re-create it!!)  It’s a huge time investment to edit and caption a short video…but here’s the result.  It’s Day 1 of Comprehensible Hebrew – from September 7 (around 3 weeks ago).

Let’s (see if I can) get beyond my Coke-bottle spectacles….  I’m living just beyond my comfort zone, trying to expose Hebrew teachers everywhere to another (and I believe better!) way, unflattering haircut be damned.

I don’t know this group of kids, other than my daughter, who is a current fourth grader.  (You’ll meet her in the video).  This is our first encounter ever!

A teacher recently commented to me that, “it’s like kids are allergic to languages other than English.”  And I started thinking about that metaphor.  It’s pretty apt!  When I was getting allergy shots in the 70’s, as I understood it, tiny bits of pollen and other environmental allergens were introduced, so that my blood would get used to the foreign material, and be sensitized over time.  And that’s the way it is with a new language!  The students aren’t familiar with the discreet sounds, the melody, the cadence, not to mention the grammar, syntax and morphology of Hebrew.  They don’t know the meaning of the words.  But rather than injecting Hebrew in a scary and painful shot, I have them swimming in a shallow pool of it.  And there are inflatable duckies and treats along the deck!  They will slowly be sensitized, and the familiar and acquired Hebrew will eventually feel as automatic and mindless as English!   No sneezing or swollen bloodshot eyes!

This phenomenon reminds me of a language quote I love:

“One must be drenched in words,

literally soaked in them,

to have the right ones form themselves

into the proper pattern at the right moment.”
-Hart Crane, American Poet

Back to the clip.  In this demo video I caption some of the foundational practices of Teaching with Comprehensible Input (T/CI), including:

*Pause, point & S-L-O-W

*Training the kids in the ‘Rules of the game’

*Careful listening

*Teaching to the eyes (-Susie Gross)

*Scaffolded questions

*Frequent comprehension checks

*Narrow, hi-frequency language

*Valuing effort to make meaning

*Choral responses

*Movement

*Fun!

Feel free to share the video with other Hebrew teachers and/or anyone interested in World Language instruction.

Drenching kids in comprehensible, compelling and contextualized Hebrew is my goal.

How’d I do?  I’d love your feedback!

Demystifying Hebrew Literacy: Part 1

screen-shot-2016-09-21-at-11-22-33-pmTo most American English speakers, languages written in non-Romanized letters seem impossibly difficult.  Their very unfamiliarity is off-putting at the least, and constitutes a deal-breaker for many.  “How can I possibly learn….? (Fill in the blank:  Hebrew, Mandarin, Arabic, Russian, etc.)  The writing is downright indecipherable!”

After 4 sessions (around +-2 hours total) of high-frequency-verb-containing Hebrew Comprehensible (auditory) Input, I decided it was time to shift gears for a moment and have our kids try their hand at Hebrew writing.  I also wanted to dispel any fear of ‘cursive without vowels’ for my students and their parents before it surfaced.  Not that they haven’t written Hebrew before….All but this year’s 3rd graders have explored the Hebrew written word to various degrees.  The younger grades (3rd – 5th) have mostly decoded liturgical Hebrew and have muddled through Modern Hebrew basal readers that slice and dice the language into isolated letters, phonemes and chunks in an effort to lay-in letter-sound correspondence (plus nikkud = vowels).  This laser focus on discreet sounds has been all but abandoned in most Language Arts classrooms, in favor of reading instruction centered on whole words and phrases, the building blocks of meaning.  The 6th graders explored trope last year as they prepared for their Bar and Bat Mitzvah, and have happily retained their solid decoding skills.

Since September 7, my 3rd through 7th graders have seen me establish meaning by writing words on the board in Hebrew, and translating them to English right below, regularly pausing and pointing to reinforce & connect the written word with sound with meaning.  Now it was time to scaffold another language experience where they’d feel successful and encouraged.  It called for a fail-proof process, so I employed my secret ace-in-the hole tool:  The humble and hardworking dry erase lap board.

Any multi-step procedure in the CI classroom is but a (cloaked) opportunity/invitation for careful listening and repetitions, so I turned the distribution and handling of the materials into Total Physical Response (TPR):

(בעברית)

Put your board, pen and eraser under your chair.screen-shot-2016-09-21-at-10-23-57-pmscreen-shot-2016-09-21-at-10-19-52-pm

Pick up your board.

Put your board under the chair.

Pick up the pen.  Open (un-cap) the pen.  Close the pen.

Put the pen under your chair.

Pick up the eraser.   Put the eraser under your chair.

Pick up the board.

I gestured and paused/pointed to all necessary vocabulary written on the big board.  So far so good.

Next I had the kids take off their name tags and place it on their lapboards, on the lined side (the flip side is un-lined).  I asked them to copy their Hebrew names with their pointer finger between the lines on the board.  I referred to this simple print and cursive Alef Bet poster I’d hung on the wall, reminding them that we’d be using cursive exclusively.  Finger spelling IS NOT BABYISH when you’re learning (reviewing?) to form new letters!

I invited my kids to uncap their markers and, with no regard for letter formation, copy their Hebrew names onto their dry-erase lapboards.  Again and again.  I circulated around the room with the other Hebrew teachers, insuring that the sofIT letters were long/tall enough, that the ’ר’ didn׳t look like a ’כ’ and so on.

It never fails.  Students love to skate and glide their markers across the shiny board surface.  And the task is so forgiving.  If you make a ’ד’ that looks like a ’צ’, then simply sweep it away with your eraser and try, try again.  Mistakes are good.  They mean you’re trying.  Confident students were encouraged to write their names without looking at their name tag exemplar.

Soon I was looking at a sea of proud faces and Hebrew-filled lapboards.

Next I modeled these instructions (I used some English here):

Erase your boards.

screen-shot-2016-09-21-at-11-16-11-pmStand up.

Raise one arm.

Close your eyes.

See your Hebrew name in your mind.

Copy your name in the sky.  (That’s right.  3rd through 7th graders skywriting.)

Sit down.

It was nearly time to go.  I asked who wanted to try a bit more writing – this time a complete sentence.  Hands shot up like weeds after a summer storm.

I urged them to write the word, ’אני’ followed by their Hebrew name, as in, ’אני עליזה’.  “I am Alisa.”  A notebook exercise blossomed into a meaningful message before our eyes.

Their faces lit up with success.

“Is Hebrew writing as hard as you thought it would be?”  “Not really.”

Not when you have what you need.  Not when your message is simple and narrow.screen-shot-2016-09-21-at-11-05-14-pm

Before class ended, I assigned the first ‘major’ homework assignment of the year:

To skywrite their Hebrew name as often as possible over the next few days – in the shower, in bed, in the car…. And for extra credit?  To extend to a sentence by putting ‘אני in front of it.   .אני שמחה


Comprehensible Hebrew on Opening Day!

Chicagoland is sweltering under a September heat wave this week.  It was nearly 90 degrees in my (day job) classroom with similar humidity (no A/C).  I taught in that before coming to teach my first ever (air conditioned!) class at TBI.  The afternoon’s festivities kept me jittery, and amid the sweaty freak-out lead-up, I realized that 30 minutes for absolute newbies would go by in a flash.  I had waaaaay over lesson-planned, so I chose to prune & snip, thereby shedding some anxiety.

screen-shot-2016-09-13-at-10-58-46-pmI wanted our kids to walk away feeling encouraged.  And successful.  And smiling.   Those were my ‘curricular goals’ from which I decided to backwards-plan.  No worries about hi-frequency structures, circling, repetitions, or the like… yet.  Just a fun, informal meeting & intro with some back-and-forth Hebrew communication.

The first group of 20+ 3rd & 4th graders included my own daughter (and #1 Hebrew cheerleader!)  I started by introducing myself to the group in Hebrew:  .אני עליזה.  אני מורה לעברית.  I wrote nearly everything I said, as it came up.  On the dry erase board in cursive/no vowels, in black, and with the English translation in red below it.  I went back to slowly pause ‘n point at it frequently.  I will be experimenting with Cold Character Reading (CCR), but these kids have also had exposure to the Alef Bet starting in 2nd grade.  So I was getting a baseline on their decoding skills.  Some were stronger than others, but it looked as though many could read the short Hebrew words and phrases on the board, when repeated, prompted and in context.  

Next, I distributed their lanyard name tags.  Most kids recognized their Hebrew names orally, but their English first & last names were pencilled on the back, just in case.  I jotted, ‘אני פה’ [‘I’m here’] on the board, and after a few repetitions, they got the hang of responding, ‘אני פה’  when they heard their name.  I modeled courtesy with ‘תודה’ [‘Thank you’], and I could feel the excitement rise as the kids could readily produce these short and appropriate utterances upon hearing their name and taking their tag!  They were proud to share what they knew.  By the time all the tags were distributed, we were nearly halfway through class!  The remainder was spent doing Total Physical Response (TPR) – the kids responded to my commands, demonstrating comprehension (or not) by doing as I requested:

Stand up/sit down.  Boys stand up.  Girls sit down.  Boys sit down, girls stand up.

Next I folded in ‘slowly’ and ‘quickly.’  Boys stand up quickly;  Girls sit down slowly…  This side [of the room] stands up; the other [side] sits down….  Just as the kids were about to ease back slowly into their chairs, I commanded them to quickly stand up!  We played unpredictably like this for a few short minutes…and they LOVED it!

When time was almost up, I asked them to reflect in English about how it felt to hear Hebrew this way.  The kids pointed out that the gestures and acting supported their understanding, that they relied on the gestures.  This was a great place to teach them the ‘stop signal’ – one fist pounding the opposite palm noise that tells me, “the meaning is not clear.”

The 5th-6th-7th grade class (50+ kids) was WAY TOO BIG.  I had a challenging ‘lift-off’ due to the sheer numbers.  Passing out  nametags and meeting the students felt long and boring, and allowed English chit-chat to erupt.  Once the Comprehensible Input got going though, we steadily got our craft aloft.  During the last several minutes of this class (from +- 5:30-6:00pm), I acknowledged how hungry we all were (patting my belly and gesturing eating).  We launched into a mini-scene with one boy walking (running?) quickly to Poochie’s (local burger joint) – I’d posted a mini poster with the restaurant’s logo on one wall – while a girl walked slowly to Portillo’s (a competing local burger joint).  I asked those who liked Poochie’s to run to that classroom location s-l-o-w-l-y; and the Portillo’s-lovers to walk to theirs quickly.  Much narrated walking and running between restaurants ensued.  By the end of class, the kids were standing in their respective restaurant zones, stimulated, energized and, well, HUNGRY!

Just before the bigger kids left, I asked them to reflect on today’s Hebrew class:

“All the gestures and acting helped me understand what you were saying.”

“I understood all your Hebrew words!”screen-shot-2016-10-11-at-11-33-25-am

“I could read the words on the board.”

“That was really fun!”

Encouraged, successful and smiling.  Not a bad way to end the workday.

PS:  I will try to edit and post parts of the videos of these classes soon.

PSS:  Here’s the link to the video!

https://www.youtube.com/watch?v=Pn7rsc7xDNA

Back-To-Public-School

Since I’ll be teaching Hebrew supplementary school starting on Wednesday (Oy!!  That’s in 4 days!!), I’ll refer to my Spanish teacher day job as Public School from now on.

As I’ve mentioned elsewhere on the blog, during the day I teach Spanish as a ‘special’ class to 1st, 2nd, 3rd and 4th graders in suburban Chicagoland.  I see each group 3 times/week, for 30 minutes per class.   We just closed out our first week back at school.

I was delighted to see how much Spanish my 3rd and 4th graders have retained even after the 2-month break!  We eased into Personalized Questions and Answers (PQA) around the topic of summer vacation.  My students are fortunate enough to have some pretty spectacular experiences, including European jaunts, hiking the national parks, and accompanying their parents on trips to Asia, Australia and beyond.  To extend our Spanish discussion and incorporate literacy, I typed their fabulous summer destinations into a simple table.  Next to the student (Spanish) name column sits the “I went to….” column.  After hearing the info orally for portions of our first two classes, the class helped me fill-in the table in real time.  I asked; they answered, I typed it into the table which was projected onscreen.  Once complete, I asked questions about who went where, I compared students’ trips, and even allowed a tiny bit of English to creep in if the student simply HAD TO share something special.  “I saw Old Faithful!”  “I went to Hamilton on Broadway!”    “I saw the changing of the guard!!”   I hope to use these fabulous tidbits and locations in our story-spinning this year, as they are important and compelling personal details and help each child feel known and honored.

My second graders were the most challenging.  Classes are larger, and the kids are exhausted by the end of the day.  We (adults) often underestimate the effect of the transition back to a full day of school for young children.  I was sure to revive fascreen-shot-2016-09-13-at-11-03-09-pmmiliar routines (i.e., greeting/goodbye song) which provide much needed structure for the wee ones.  But alas, my classroom is sweaty (no air conditioning); the chairs are hard (transitioning from the rug and  plenty of stretching and movement can only help so much!) and the kids are tired, hungry, need a Band-Aid, want a drink, have a tummy ache, just lost a tooth…in short, they find it hard to stay focused.  This will change as they grow accustomed to the new school year and schedule, but it means that I can’t expect or push too much…yet.  Limited language input, no full-on circling, lots of movement (we did some modified yoga poses) and plenty of props.  We picked our favorite (plastic) snacks and using “want” and “looks for,” we pretended to eat them.

First graders were mesmerized by their first week of Spanish.  The groups are tiny, and I’m visiting them at the rug in their own classroom, at least until the groups ‘gel’ and they’re ready to transition to my Spanish classroom.  THIS MAKES A HUGE & POSITIVE DIFFERENCE!  They’re beyond excited about their new Spanish names.  It’s like they’re in a trance when they hear me speak – you can hear a pin drop!

Takeaways for my upcoming Hebrew lessons:

•Start slowly and don’t push too hard.  Don’t expect (hardly any) output.

•Limit the input.  Short, in-bounds sentences and questions.

•Predictability and structure, especially important for younger groups.

•Inject humor with props, funny images, costume elements, etc.  This lowers anxiety (i.e., The Affective Filter).

•Observe closely:  Change it up when attention flags.  Outta the chairs and Move, Move, Move!

Ringmaster’s Tools for Classroom Management

Let’s start with my norms poster, here.

These are my always-in-draft class norms.  I’ve used them in my Spanish class for a few years, laminated and posted on the board in English (since my students wouldn’t understand if the poster were in Spanish.)

First let me say that these norms were gleaned from many conferences, workshops and conversations, and that retired T/CI legend and mentor from Denver Public Schools, Ben Slavic, provided the content for a first draft.  He has a longer list of classroom expectations, from which I extracted and massaged these nuggets. He has created so many key documents and written about so many issues we Comprehensible Input language teachers need to consider – I highly recommend you check out his website.  He also has a great Professional Learning Community (PLC) blog!circus-tent-pic


OK, back to the norms.  The document* is entitled, “!יש,” which Yael Even, an elementary Hebrew teacher in Israel tells me is the best Hebrew slang equivalent to “High Five!”  Listed are 5 classroom norms:

  1.   Not surprisingly, active listening with the intent to understand is a novice language learner’s most essential behavior.  Next comes the tricky part.  Students are requested to signal tScreen Shot 2016-09-02 at 11.23.33 AM
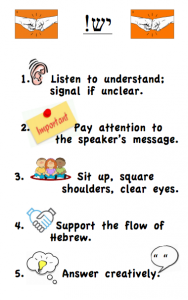
he teacher (I have established a fist pounding the palm action/noise signal) if meaning is not clear.  I used to say, “Signal me if you don’t understand,” but really, folks, the onus is on us, the teachers, to make sure we are comprehensible, so I tweaked my poster language to reflect that reality.  I walk over and fist bump the student who signals me (!יש), reinforcing my standard:  “Thank you for letting me know I was not understandable!  It’s my job to make sure everyone understands!  We’re all here to understand Hebrew messages!”   I translate the problematic word/phrase/utterance, gesture and re-check for comprehensibility.  Alas, you should know that young learners often do not signal when they’ve fallen off the comprehension train, so eager are they to extract meaning that they forget.  So we must redouble our efforts, frequently checking for comprehension:  “What does ‘XYZ’ mean?”  “What did I just say?” and constantly recycle and repeat, reviewing the facts of the story once again before adding on to it.

2.  Paying attention to the speaker’s message is obvious enough however, norm #2 used to read, “Eyes on the speaker.”  I have since learned that plenty of students can and do demonstrate comprehension without locking eyes, and that not all students are comfortable making eye contact.  So while I prefer to see their eyes and confirm that they’re not distracted by their new shoes, the Lego in their pocket, or a scrap of paper on the rug, etc., I do regular and frequent comprehension checks to insure that all kids get it.

3.  Body posture may sound trivial, but it’s part of the attention package.  Since I jettisoned my students’ desks/tables and only have chairs, posture is less of an issue for me, plus I regularly get my students up and moving.  (See my post, Let this groove get you to move).  The older/less interested the student, the more of an issue posture may become.  Posture is a form of nonverbal communication, and if/when there’s an infraction, I matter-of-factly explain this.

4.  Norm #4 is about blurting and interruptions.  Since I’m often inviting story details and suggestions from my students, our conversations aren’t always mediated by hand raising/permission-giving.  This is natural, and it’s a good thing!  However, sometimes excited classmates can’t resist the urge to blurt (They are SOOO engaged!!), often in English.  Norm #4 is a reminder to engage in respectful conversational turn-taking in the Target Language.

5.  Norm #5 encourages students to take the time to come up with cute and clever ideas during story-asking. Younger students often want the chance to offer an idea, any idea, to have their voice heard.  I honor this and use it as an opportunity to get more repetitions, as in, “Class, Jorge says the dinosaur’s name is Billy Bob Joe.  Adriana says the dinosaur’s name is Rainbow.  What does Alexander say?”   If I go around the whole class, I get LOTS of reps on ‘says’ and ‘name is.’  Good, hi-frequency storytelling language!

Finally, I do not ‘go through’ the 5 class norms at the beginning of the school year.  I point to and briefly discuss one behavior at a time, as it naturally emerges, and go back and point to it when it inevitably comes up again.

*Print it on (long) legal size paper to get it on one sheet.

Ways and Means

Beginning of the School Year Logistics

Here’s our Hebrew & Religious School schedule:screen-shot-2016-09-13-at-11-13-07-pm

Wednesdays, 4:15 – 6:00pm

Sundays, 9:00 – 12:10 (of which the last hour, 11:10 – 12:10 is dedicated to Hebrew instruction)

Wednesday, September 7 is opening day.   The 3rd-4th grade group (29 kids total), hereafter referred to as Group A, will come see me right away, from 4:20-4:50, then return to their classroom with their teacher for liturgical Hebrew & religious studies.  Then Group B (53 kids, grades 5, 6, and 7)*, who started with liturgical Hebrew/religious studies in their classroom, will visit me from 4:55-5:25.  Eventually, (say, after 2 or 3 sessions?) the 30-minute Hebrew slots will increase to 45 minutes, with each group getting around 15 minutes of literacy extension after the 30 minutes of oral work.  This will eventually fill the Wednesday session.

It will take some coordinated practice (and wrangling) to get everyone settled for a punctual startup and transition between groups.

Class Lists/Hebrew Names:

I have asked the school office for class lists by grade, in the form of a 3-column table, with each student’s full English name in the first column, his/her Hebrew first name in the center (hand-written is fine), and then an empty column to the right.  This will serve as a excellent template for some early personalization and (onscreen?) class survey activities, allowing us to get to know each other as we build our playful community.

We’re also ordering name tags – the reusable vinyl sleeve kind on a lanyard – and will have kids wear their Hebrew name (written in cursive Hebrew) while attending class, until we all learn each others’ Hebrew names.  These will be collected and stored in the Hebrew Room.  If a student doesn’t have a family-given Hebrew name, I believe assigning one is a good idea.  Why?  It’s a great way to:  Establish/reinforce that this is a Hebrew-speaking zone; Practice decoding (the names) in Hebrew – very high interest!;  and introduce common Hebrew/Israeli names, which are part of Israeli culture.  Click here for a list of popular Israeli Hebrew names.

Classroom Environment:

Before opening day, I’ll set up my teaching space, making sure that it’s inviting and appealing, but also posting some of the most basic language I know I’ll need right away.  To start, I’ll probably only hang a few question words, (‘Who?’ ‘What?’ and ‘Where?’) from my printable mini-poster collection of hi-frequency verbs and interrogatives, the Hebrew Word Wall 2016.  (The Word Wall can also be found on the Novice Hebrew Corpus page.)  The walls will start relatively bare, but they’ll grow increasingly text-rich as more Hebrew is acquired and needed in context.  I don’t want to overwhelm the kids with a bunch of words they don’t know yet!  I’ll also make sure the large dry-erase whiteboard & markers are in place, and that my props are sorted in bins for easy access.

I wear a wireless headset microphone when I teach (move over, JLo)- indispensable for those of us who teach multiple daily classes using Comprehensible Input.  It really spares our voices!

My laptop computer will be connected to the overhead projector, and can toggle with the document camera to project images from paper and computer, plus videos etc. onscreen.

We’ll have a chair for each student, arranged in a horseshoe or herringbone configuration (not sure – haven’t worked in that space yet.)  No desks or tables.  This set-up frees up space for dramatization and movement, and affords general flexibility, plus writing will mostly be done on dry-erase lap boards, which can also be used as lap tables when kids write in their notebooks.

I’ll post a separate article/s on writing once we get rolling, and will also upload photos of my new Hebrew classroom digs.

I plan to upload links to video footage of our classes with reflection/commentary after class.  As soon as we figure out the tech requirements to do so, I’ll create a space on this blog where you’ll be able to view and comment on our novice Hebrew classes, both Group A (the 3rd-4th grade group) and Group B (the 5th – 7th graders.)

Please feel free to post questions about my before-opening-day prep or anything else on the blog, or email me at cmovanhebrew@gmail.com!

*ADDENDUM:  With over 50 kids, the 5th through 7th grade group is waaaaay too big and unwieldy to teach all together.  To address this challenge, I will break out the 5th grade group and teach them separately.  So I’ll teach 3x 30-minute sections on Wednesdays, and 3x 20-minute sections on Sundays.  Also, to save time, Hebrew teachers will distribute and collect their students’ name tags and store them in plastic baggies in their classrooms.